
Limiting Window Resizing
Resizing Controls
|
|
Home |
 |
Back To Tips Page |
|
|
Limiting Window ResizingResizing Controls |
|
One of the problems that arises when you have a resizable limit is preventing the window from becoming too small. There is also an issue about limiting the maximum size.
This article shows how to limit the minimum size. The technique of limited the maximum size is left as an Exercise For The Reader (but I'll talk about some of the issues involved).
This particular technique deals with a dialog-based app, but it can apply to any window. You can also apply it to a CFormView class, CPropertyPage class, or other class.
If you apply this to a CMainFrame class, you probably have to use GetDeviceCaps to compute the resolution of the screen in pixels-per-inch, but I have done this so rarely that I am not convinced it matters very much.
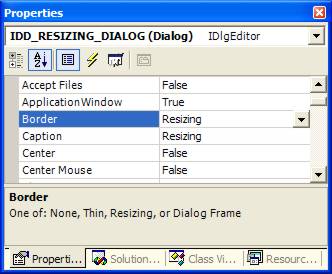
In the case of a dialog, you will have to set the Border property of the dialog to be Resizing:
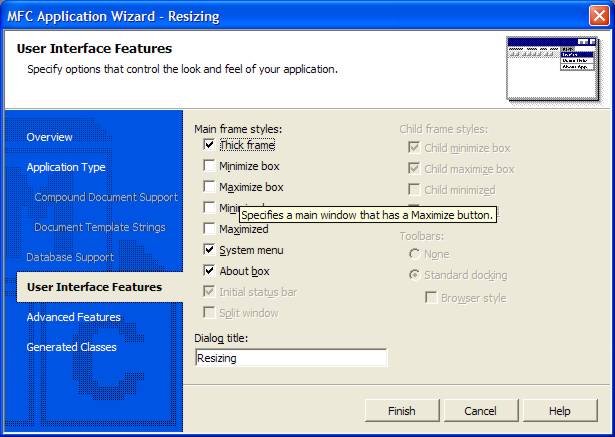
You can also do this by going to the User Interface page and selecting Thick Frame
A key concept here is that there are no hardwired constants, anywhere. If you choose a size, in pixels, and hardwire it, you have an application that works correctly only on your machine, with your display card, a particular version of the display driver, the current screen resolution you are using, and the current default font size. Changing any of these parameters may cause a hardwired number to malfunction, because dialogs will dynamically resize to accommodate all the aforementioned parameters of your display.
So the trick is to make the resizing limit adapt as well.
 This trick is done by creating a frame that is part of the dialog and will
therefore automatically resize to the desired size.
This trick is done by creating a frame that is part of the dialog and will
therefore automatically resize to the desired size.
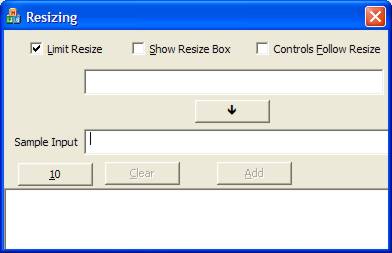
I did this in my Resizing project. In this project, I wanted to have a resizable dialog where the picture could fill the lower section, but I couldn't resize it so small that the controls disappeared.
The check boxes are there so you can turn the resizing mechanisms on and off selectively; it also lets me get nice screen snapshots for this article.
What I did was create a static control whose id was changed from IDC_STATIC to IDC_FRAME. I mark the control as "invisible" by setting its Visible property to FALSE. This is the control which is shown with its selection handles enabled.
I used ClassWizard ("Add Variable") to create a control variable that represents this frame. This will generate, in the header file
CStatic c_Frame;
and in the DoDataExchange there will bind this variable to the actual HWND of the control.
I have to implement a WM_GETMINMAXINFO handler that sets the minimum tracking size.
It is important to realize that during the window creation process, WM_GETMINMAXINFO can be issued, perhaps several times. At least one of these will arrive before the child controls are created, so you cannot depend upon having the actual frame there. Therefore, you have to make sure the window exists.
In the code below, this test is done by GetSafeHwnd(), which returns NULL if there is no HWND.
The MINMAXINFO structure is
typedef struct tagMINMAXINFO {
    POINT ptReserved;
    POINT ptMaxSize;
    POINT ptMaxPosition;
    POINT ptMinTrackSize;
    POINT ptMaxTrackSize;
} MINMAXINFO, *PMINMAXINFO, *LPMINMAXINFO;
The parameters you want to set for mouse resizing are ptMinTrackSize and ptMaxTrackSize. We are going to concentrate on ptMinTrackSize.
The handler I wrote for this is
void CColorPickupDlg::OnGetMinMaxInfo(MINMAXINFO FAR* lpMMI)
   {
    // Limits the size to the frame
    if(c_Frame.GetSafeHwnd() != NULL)            // [1]
       { /* has frame */
        CRect r;                                 // [2]
        c_Frame.GetWindowRect(&r);               // [3]
        ScreenToClient(&r);                      // [4]
        CalcWindowRect(&r);                      // [5]
        lpMMI->ptMinTrackSize.x = r.Width();     // [6]
        lpMMI->ptMinTrackSize.y = r.Height();    // [7]
       } /* has frame */
    else
       CDialog::OnGetMinMaxInfo(lpMMI);          // [8]
}
That's all there is to it!
Without the resize-limited code, it would be possible to get this kind of resizing of the dialog:
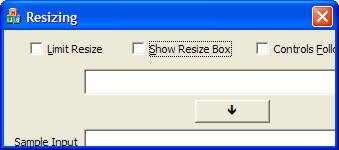
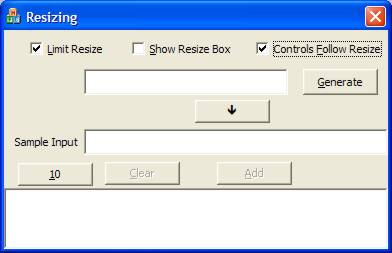
Note there are several serious problems with this. Controls have been lost, some are partially covered. But if we enable the "Limit Resize" box, then the smallest the control can get is as shown below:
But this still has a problem, because if you consult the original picture you will see that the Generate button and the right part of the Sample Input edit control are missing!
We will show how the controls can follow the resizing after we address the problem of maximum size.
There are a couple ways of dealing with this, depending upon your intention.
To limit the maximum size to "no larger than its original size", you can simply record the maximum size. For example, you might add two members to your dialog class:
protected:
    CRect MaxSize;
    BOOL initialized;
In OnInitDialog you can do the following:
BOOL CMyDialog::OnInitDialog()
   {
    ... all sorts of stuff here
    GetWindowRect(&MaxSize);
    ScreenToClient(&MaxSize);
    // Note that since this is already the dialog, we have the wndow rect, so
    // we don't need to do CalcWindowRect
    initialized = TRUE;
    ... maybe other stuff here
    return TRUE;
   }
then you can add the following lines to the OnGetMinMaxInfo
if(initialized)
   {
    lpMMI->ptMaxTrackSize.x = MaxSize.Width();
    lpMMI->ptMaxTrackSize.y = MaxSize.Height();
   }
Another approach is if you want to set a maximum size that is limited by some size of your choice. In this case, you need to add at least one, and perhaps two, invisible framing rectangles in addition to the minimum rectangle.
The larger rectangle, IDC_MAXFRAME, is the maximum size you wish to set the dialog to. You create a large rectangle (and you have to expand the dialog to accommodate this) and give it the ID suggested, and set its Visible property to FALSE. Then you have the rectangle that represents the minimum frame size, call it IDC_MINFRAME, and use it as described above. If the default size of the dialog is neither of these, you will need a third frame, IDC_NORMSIZE. Now the trick here is that in OnInitDialog, you compute the size of the window required to hold the "Normal size".
BOOL CMyDialog::OnInitDialog()
   {
    ...
    c_MaxSize.GetWindowRect(&MaxSize);
    ScreenToClient(&MaxSize);
    CalcWindowRect(&MaxSize);

    c_NormSize.GetWindowRect(&NormSize);
    ScreenToClient(&NormSize);
    CalcWindowRect(&NormSize);
    SetWindowPos(NULL, 0, 0, NormSize.Width(), NormSize.Height(), SWP_NOMOVE | SWP_NOZORDER);
    ...
   }
Resizing controls is not difficult, merely tedious. The simplest approach to this is to arrange your controls so things like edit controls run from some left position to the right size of the screen, and some display control such as a ListBox, List Control, picture, or whatever is arranged so that it is in the lower quadrant of the control, and typically is anchored to the far left of the screen.
 Note
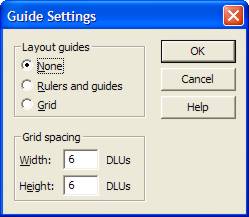
that to accomplish this, you need to remove the "guides" from the dialog.
Go to the Format menu, select Guide Settings..., and when the
dialog show to the left appears, select the option None as shown, and
click OK. Now you can stretch controls out to the ends of the dialog.
Note
that to accomplish this, you need to remove the "guides" from the dialog.
Go to the Format menu, select Guide Settings..., and when the
dialog show to the left appears, select the option None as shown, and
click OK. Now you can stretch controls out to the ends of the dialog.
Next, place your controls. In the ColorPickup example, note that I have simply created a small bitmap control. At runtime, this control will stretch to fill the entire lower portion of the window.
Your life is considerably simpler if you can settle for controls that will stretch to the right edge of the window. We'll talk later about the techniques to apply if this is not actually the case.
Next, create an OnSize handler. Like the OnGetMinMaxInfo handler this handler could be called several times, and it could be called before all the controls are created, so we will actually test the validity of the control handle using GetSafeHwnd().
Let's start with a simple OnSize handler, one which simply resizes the ListBox at the bottom of the page. The control variable that represents this control is c_Log. The code would look like
void CResizingDlg::OnSize(UINT nType, int cx, int cy)
    {
     CDialog::OnSize(nType, cx, cy);

     if(c_Log.GetSafeHwnd() != NULL)
        { /* resize listbox */
         CRect r;
         c_Log.GetWindowRect(&r);
         ScreenToClient(&r);
         c_Log.SetWindowPos(NULL,                      // no Z-order change
                            0, 0,                      // no position change
                            cx - r.left, cy - r.top,   // new width, height
                            SWP_NOMOVE | SWP_NOZORDER);
        } /* resize listbox */
    }
Here's an example of keeping a control centered on the dialog even as it is stretched. The "Transfer" button (the "ê" button) should remain centered on the dialog. This is done by
         if(c_Transfer.GetSafeHwnd() != NULL)
            { /* center transfer button */
             CRect r;
             c_Transfer.GetWindowRect(&r);
             ScreenToClient(&r);
             c_Transfer.SetWindowPos(NULL,                      // no Z-order change
                                     cx / 2 - r.Width() / 2,    // horizontal position is centered
                                     r.top,                     // but the vertical position is the same
                                     0, 0,                      // no size change
                                     SWP_NOZORDER | SWP_NOSIZE);
            } /* center transfer button */
This is about the only time you will see hardwired constants in a computation of a window size or position: when a ratio (in this case, 2) is involved in the computation relative to some other dynamically-computed value.
This would be a simple case, typically an edit control that is stretched from its anchor position to the right edge. To handle this, we add code to the OnSize handler as follows
         if(c_Input.GetSafeHwnd() != NULL)
            { /* resize input */
             CRect r;
             c_Input.GetWindowRect(&r);
             ScreenToClient(&r);
             c_Input.SetWindowPos(NULL,          // no Z-order change
                                  0, 0,          // do not move
                                  cx - r.left,   // new width
                                  r.Height(),    // same height
                                  SWP_NOMOVE | SWP_NOZORDER);
            } /* resize input */
Note that this looks much like the previous resizing, but the height remains constant.
This is a situation where we have two or more controls where we have to maintain a relationship between two or more controls.
When there are a small number of these controls, you can save the relationships in class variables of the CDialog-, CFormView-, or CPropertyPage class, which is what I'll show here. When I have multiple controls, I have sometimes chosen to store a value such as the right-gap value, in the DWL_USERDATA field of the control.
First, lay out the controls as you want to see their relationship maintained. Then, in the OnInitDialog handler, capture the appropriate relationships. It helps a lot if you write meaningful documentation in your source code:
         // +--------------------------------------------------------------------------+
         // |     +----------------------------------------------+   +-------------+   |
         // |     |  c_Buzz                                      |   | c_Generate  |   |
         // |     +----------------------------------------------+   +-------------+   |
         // +--------------------------------------------------------------------------+
         //                                                      |<->|             |<->|
         //                                            EditGenerateGap             GenerateRightGap
Never hesitate to put drawings line this in your code! The number of times drawings like this have saved me is significant. For example, the time a client returned an app I'd written with the directive "We've added new features to our line of controllers, please add [list of features here] to support them", five years after I'd written the code...I wasn't confident I could do it until I found the data structure layout diagram done in "ASCII art", and the result was I was able to make the new additions in less than a day.
In the OnInitDialog I compute the indicated gap values:
    // Compute the 'GenerateRightGap' value
    CRect gen;
    c_Generate.GetWindowRect(&gen);
    ScreenToClient(&gen);

    CRect r;
    GetClientRect(&r);
    GenerateRightGap = r.right - gen.right;

    // Compute the 'EditGenerateGap' value
    CRect buzz;
    c_Buzz.GetWindowRect(&buzz);
    ScreenToClient(&buzz);
    EditGenerateGap = gen.left - buzz.right;
These values are then used in the additional code in the OnSize handler:
         if(c_Buzz.GetSafeHwnd() != NULL && c_Generate.GetSafeHwnd() != NULL)
            { /* co-move */
             CRect buzz;
             c_Buzz.GetWindowRect(&buzz);
             ScreenToClient(&buzz);

             CRect gen;
             c_Generate.GetWindowRect(&gen);
             ScreenToClient(&gen);

             c_Buzz.SetWindowPos(NULL,
                                 0, 0,   // no position change
                                 cx - (GenerateRightGap + gen.Width() + EditGenerateGap) - buzz.left,
                                 buzz.Height(),
                                 SWP_NOMOVE | SWP_NOZORDER);

             c_Generate.SetWindowPos(NULL,
                                     cx - GenerateRightGap - gen.Width(),   // left edge of generate
                                     gen.top,
                                     0, 0, // no size change
                                     SWP_NOSIZE | SWP_NOZORDER);
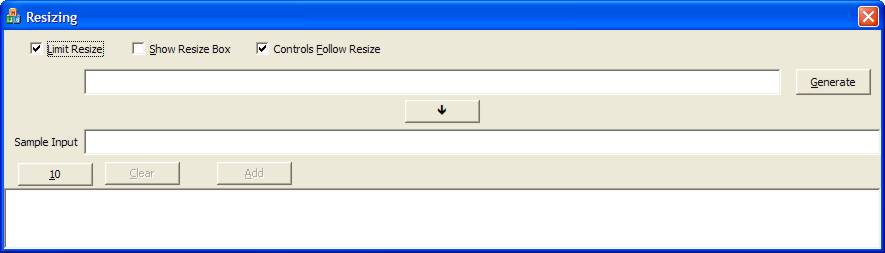
So now we can get the controls to follow the resizing. To enable this in the sample application, I only have to check the "Controls Follow Resize" check box. Note the relationships are maintained properly in the two different sizes of windows.
It gets a little messy if, during the resizing, controls which are moved end up moving over top of the positions of older controls, even if those controls have been moved to new positions. The effect is some really ugly redrawing artifacts. The appearance is abysmal.
Here, we have to move outside the MFC framework (it is not at all clear why these capabilities are not part of MFC!) The technique is to use deferred window positions, which accumulates all the changes and applies them all at once. The result is the ugly redrawing artifacts go away.
Here's an example from the Cylinder Explorer:
The first thing you do is create a deferred window position handle. You will get better performance if you specify an initial size for its internal array (rather than end up with an exponential-copy situation each time you add a new handle). So you write
HWDP wndpos = ::BeginDeferWindowPos(n);
where n is your estimate of the number of controls you are going to move. It it is a little too big, no real problem, and if it is a bit too small (because you added a few more controls later), you lose nothing but a little performance. Note the use of :: because this is an API in the global namespace.
Now, instead of calling CWnd::SetWindowPos or ::SetWindowPos, you call ::DeferWindowPos:
         wndpos = ::DeferWindowPos(wndpos, x_Width.m_hWnd, NULL,
                                   0, 0,
                                   image.cx, widthCaptionRect.Height(),
                                   SWP_NOMOVE | SWP_NOZORDER);
Because this is not supported in MFC, you have to use the raw API. The first two parameters are the HWDP handle you got from ::BeginDeferWindowPos, and the second parameter is the HWND of the window you want to move (in the above example, the window is represented by a control variable, x_Width). The remaining parameters are the same as for SetWindowPos.
You move all the controls in this fashion, and when you are all done, you call ::EndDeferWindowPos, passing in the HWDP:
::EndDeferWindowPos(wndpos);
When this is done, all the windows are redrawn at their new positions in a fashion that avoids the ugly overlap artifacts. That is, the redrawing order is computed on-the-fly for the particular arrangement of windows. Note that this works no matter how you are rearranging the windows, so even if there would not be a problem (for example, if you are expanding the dialog and there is no overlap of the controls), the use of ::BeginDeferWindowPos/::DeferWindowPos/::EndDeferWindowPos is essentially harmless, and if there would have been overlap, they are essential!
Managing the debugging of resizing can be tedious. Looking at the variables in the debugger is tedious and often not informative. Adding decent debugging output can be worth the effort. For this example, I added the following TRACE statements:
             TRACE("|    +----------------------+  +------------+    |\n");
             TRACE("|    |  c_Buzz              |  | c_Generate |    |\n");
             TRACE("|    +----------------------+  +------------+    |\n");
             //     |    XXXX                XXXX  XXXX      XXXX    |
             //     |XXXX                        XXX             XXXX|
             TRACE("|    %-4d                %4d  %-4d      %4d    |\n", buzz.left, buzz.right, gen.left, gen.right);
             TRACE("|%4d                        %-3d             %4d|\n", buzz.left, EditGenerateGap, GenerateRightGap);
which generates the following trace output in the output window. The "..." shows where I chopped out some of the output so the long tracing wouldn't be boring.
|    +----------------------+  +------------+    |
|    |  c_Buzz              |  | c_Generate |    |
|    +----------------------+  +------------+    |
|    80                   380  395        470    |
|  80                        15                10|
|    +----------------------+  +------------+    |
|    |  c_Buzz              |  | c_Generate |    |
|    +----------------------+  +------------+    |
|    80                   386  401        476    |
|  80                        15                10|
...
|    +----------------------+  +------------+    |
|    |  c_Buzz              |  | c_Generate |    |
|    +----------------------+  +------------+    |
|    80                   528  543        618    |
|  80                        15                10|
...
|    +----------------------+  +------------+    |
|    |  c_Buzz              |  | c_Generate |    |
|    +----------------------+  +------------+    |
|    80                   716  731        806    |
|  80                        15                10|
,,,
|    +----------------------+  +------------+    |
|    |  c_Buzz              |  | c_Generate |    |
|    +----------------------+  +------------+    |
|    80                   772  787        862    |
|  80                        15                10|
This makes the debugging a lot easier.
Spending a little time making your debugging output pretty and readable is often worthwhile. I can spend an afternoon writing a nice debugging display and save a week of debugging effort. I've done it many times.
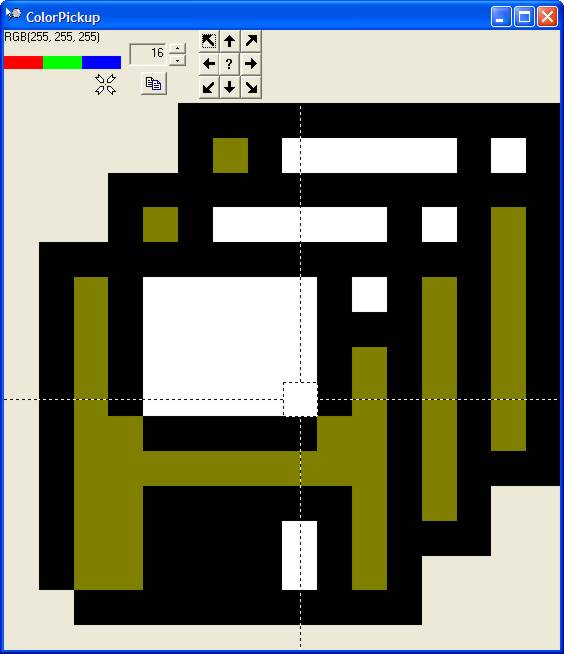 In
my ColorPicker project had an unusual requirement. For this control, I had
to maintain a square aspect ratio of the window because I had to maintain
"square" magnified pixels.
In
my ColorPicker project had an unusual requirement. For this control, I had
to maintain a square aspect ratio of the window because I had to maintain
"square" magnified pixels.
Where the ResizeImage function is written as shown below. Note that it has an odd computation for the width and height, for reasons that will be explained.
void CColorPickupDlg::OnSize(int nType, int cx, int cy)
    {
     if(c_Image.GetSafeHwnd() != NULL)
        { /* resize image */
         CRect r;
         c_Image.GetWindowRect(&r);
         ScreenToClient(&r);
         int n = max(cx, cy - r.top);
         c_Image.SetWindowPos(NULL,
                              0, 0,  // not used
                              n,
                              n,
                              SWP_NOMOVE | SWP_NOZORDER);
         c_Image.RecomputeImage();
        } /* resize image */
    } // CColorPickupDlg::OnSize
This computes the window rectangle of the child control to be resized, and converts it from screen to client coordinates.
This window has to remain "square" so that it displays the pixels correctly. So this is a rather unusual resizing. I make sure that the image is always square, even if parts of the image are going to "hang off" the bottom or right side and be clipped by the window. So I choose the maximum value of the width and height, n, and change the window size to make sure the image remains square but fills the area.
At this point, I call my method RecomputeImage to pick up the pixels from the screen and display them.
If you wanted the image to be square but did not find the "overhang" acceptable, you could use the min function rather than the max function.
To get the caption for the "transfer" button, I went to the Character Map and chose the "ê" character, and copied it to the clipboard. Then I went to the Properties of the control and did a paste operation into the Caption. This appeared as a "ê" character. But in OnInitDialog I changed the font. Note that because I am using a symbol font (WingDings) I had to set the SYMBOL_CHARSET in the LOGFONT structure:
    CFont * f = c_Transfer.GetFont();
    LOGFONT lf;
    f->GetLogFont(&lf);
    StringCchCopy(lf.lfFaceName, sizeof(lf.lfFaceName)/sizeof(TCHAR), _T("Wingdings"));
    lf.lfCharSet = SYMBOL_CHARSET;
    VERIFY(WingDings.CreateFontIndirect(&lf));
    c_Transfer.SetFont(&WingDings);
The technique is to get the existing font from the control (which is set at dialog creation), obtain its LOGFONT properties, modify its lfCharSet and lfFaceName values, and create a new font. Note the use of the strsafe.h function StringCchCopy to guarantee there can be no buffer overrun condition. And especially note the sizeof usage: because in a Unicode app, sizeof is the number of bytes, but StringCchCopy wants a character count, so to convert the byte count to a character count I have to divide by sizeof(TCHAR). The CFont WingDings is a class member variable of the CDialog-derived class.
This project also illustrates how to implement a copy-to-clipboard operation. This aspect is described in a separate article.
The Clear button should be disabled if there are no items in the ListBox. This is discussed in a separate article on Dialog Control Management.
This is handled by my program simply calling updateControls() every time it makes a change in any control. updateControls() is like OnPaint: it recomputes the enabling and visibility of every control from first principles, every time, so there is never any enabling or visibility code scattered around in the code. Thus there are never any discontinuities in control state created by failing to update, correctly, every different place in your code where the controls are changed. There is one, and exactly one, place where this is done, and it is the only place you need to maintain!
In my code it is very simple
void CResizingDlg::updateControls()
    {
     CString s;
     c_Input.GetWindowText(s);
     s.Trim();
     c_Add.EnableWindow(!s.IsEmpty());

     int n = c_Log.GetCount();
     c_Clear.EnableWindow(n > 0);

     c_Frame.ShowWindow(c_ShowFrame.GetCheck() == BST_CHECKED ? SW_SHOW : SW_HIDE);

    } // CResizingDlg::updateControls
Note that I also check to make sure the text is non-blank, not just "empty". The Trim method simply removes leading and trailing whitespace, which means that if the text had just blanks in it (or empty lines in a multiline control, because whitespace includes carriage-return/linefeed sequences) then the control to store will not be enabled. The Clear button is enabled if the ListBox is non-empty, and the frame is shown only if the user has selected the option to show it.
There are people who will argue that all this "redundant" computation "wastes time". They clearly have lost their grasp of reality. Reality is that your code is correct and robust, and can be created and maintained cost-effecitively, and "efficiency" is such a low-priority concept in this list that it should not even enter the discussion.
Spacing can often be managed by using interesting constants, such as n * ::GetSystemMetrics(SM_CXBORDER) and n * ::GetSystemMetrics(SM_CXEDGE). A convenient value which is display-independent and is fairly wide can be obtained from ::GetSystemMetrics(SM_CXHSCROLL).
When you want to create controls dynamically, such as edit controls, labels (CStatics) and combo boxes, create an invisible prototype somewhere on the window. You can use GetWindowRect(&r); and use r.Height() to create the window. In some cases, if you know the desired width, you can use the prototype's r.Width() as well. This saves you from many of the disasters that occur when the end user selects large fonts as the default.
Using the "invisible frame" technique has all kinds of applications; sometimes you need a grid for layout, and you can use a prototype frame control to determine position and layout dimensions, and a pair of frames to get inter-control spacing of the kind you want.
If you need to create an unusual control and don't want to go through all the work to get it into the dialog at design time, use an invisible frame to specify where it should go, and use that invisible frame's rectangle to determine the position and size of the newly-created control. In addition, you can share the control IDs:
CRect r;
c_MyControlFrame.GetWindowRect(&r);
ScreenToClient(&r);
c_MyControl.Create(..., r, c_MyControlFrame.GetDlgCtrlId());
c_MyControlFrame.DestroyWindow();
Do not use a pointer to your window class and do new if you can avoid using pointers at all. When a fixed number of windows (often just one) is used, either use individual variables (if diverse types) or arrays of variables (for groups of controls of the same type that might be best considered as related, such as an array of checkboxes for items 1..n). Use pointers only when absolutely necessary.
Bad:
CMyControl * c_MyControl  // in class header file
c_MyControl = new CMyControl;
c_MyControl->Create(...);
Good:
CMyControl c_MyControl;  // in class header file
c_MyControl.Create(...);
It is better to create controls at design time and hide unneeded controls at runtime than to create controls at runtime.
Do not overlap controls. If controls must overlap, use one of them as the "reference coordinate" and move the other from a non-overlapping location to the desired location at runtime. It is nearly impossible to maintain a dialog that has controls which are drawn as overlapping controls, so avoid this at all costs.
When using multiple groups of overlapping controls, consider using child dialogs (make sure you set the DS_CONTROL style) rather than massive sets of overlapping controls.
SetWindowPos is almost always a better choice than MoveWindow, because you can easily move windows without resizing, or resize them without moving them.
If you've hardwired a constant in pixels anywhere in your code (other than 0,0) you've lost already. The only question is how much pain you will go through before you finally realize this.
This article summarizes a set of tricks I use to handle control resizings. Generally, I do not have complex problems that are handled by "layout managers" such as the one found at http://www.codeproject.com/wtl/dialoglayout.asp
If your task is more complex you may want to use the more complex approach which simplifies your problems in the long run.
In addition, I show how to capture the contents of a ListBox to the clipboard, and I also show some debugging techniques that make life easier.

| 17-Jun-11 | Revised with discussion of ::BeginDeferWindowPos, ::DeferWindowPos, and ::EndDeferWindowPos. |
![]()
The views expressed in these essays are those of the author, and in no way represent, nor are they endorsed by, Microsoft.